本文主要介绍如何在Windows上搭建STM32的开源开发环境
使用到的工具有:VSCode, arm-none-eabi-gcc,TortoiseGit,OpenOCD, mingw32-make,
在整个开源环境中,可以完成开发,编译,下载,调试这些基本功能。
TortoiseGit安装
TortoiseGit是Windows下的图形化git工具,这里选择它是因为它还提供了一个mingw的环境,后继的开发可以使用这个mingw环境,就不用再额外安装了。
官方下载地址: https://tortoisegit.org
安装时勾选上bash相关的内容,安装成功后在右键菜单中可以进行到bash环境。
为了方便后面的使用,我们还需要在TortoiseGit的bash环境中加入make命令。笔者的电脑上有Qt的开发环境,我从里面找到了一个mingw32-make的exe文件,把名字修改成make后放到了【git安装目录】/mingw64/bin中。
注意是git的安装目录,不是TortoiseGit的目录。在这里我也把这个Qt中的mingw32-make文件上传了,点击下载 make 。
虽然这个make是32位的,但是放在mingw64中也可以很好的运行,应该是这个make没有什么外部依赖,所以在哪都能运行。
通过右键菜单进入GitBash,输入make,看看我们的make是否安装成功。
Git默认安装在“Program Files”目录中,这个目录名中有一个空格,有些时候会出一些问题,笔者建议将Git相关的的东西安装在一个目录中没有空格和中文的地方。
arm-none-eabi-gcc安装
arm-none-eabi-gcc是针对ARM处理的gcc工具
官方下载址: arm-none-eabi-gcc
可以只下载zip包,解压后在环境变量中配置上相应的路径就行了。在命令行中输入arm-none-eabi-gcc检测是配置成功。
OpenOCD安装及测试
这里我使用OpenOCD做为gdb server,有了gdb server之后就可以用arm-none-eabi-gdb进行调试了。
先去网上下载一个编译好的OpenOCD程序,https://gnutoolchains.com/arm-eabi/openocd
解压后将OpenOCD的bin目录放到PATH环境变量中,然后在命令行中输入openocd,检测是否安装正确。
测试OpenOCD是否工作正常,以我手上的f723 discovery为例,输入下面的命令:
D:\TeenyUSB\demo\custom_bulk>openocd -f interface/stlink.cfg -f target/stm32f7x.cfg -f target/patch_stlink.cfg -c "program output/f723bulk.elf verify reset exit"
运行后如果提示verified OK,说明烧写成功,至此OpenOCD安装成功。
上面的patch_stlink.cfg是我新建的一个文件,放在【OpenOCD安装目录】/share/openocd/scripts/target 这个路径中,用来解决ST-link没有RST信号停止芯片失败的问题。
这个文件中只有一行命令,内容如下:
reset_config none separate
VSCode安装及配置
这里我选择VSCode作为集成开发环境,并把前面提到的工具配置到VSCode中,完成开发。
VSCode官网:https://code.visualstudio.com
VSCode编译环境配置
VSCode中使用tasks.json配置编译环境,这里我使用的是mingw环境调用makefile进行编译。
tasks.json内容如下:
{
    // See https://go.microsoft.com/fwlink/?LinkId=733558
    // for the documentation about the tasks.json format
    "version": "2.0.0",
    "tasks": [
        {
            "label": "build",
            "type": "shell",
            "command": "C:\\Program Files\\Git\\bin\\sh.exe",
            "args": [
                "--login",
                "-i",
                "-c",
                "make -j4"
            ],
            "group": {
                "kind": "build",
                "isDefault": true,
            },
            "presentation": {
                "reveal": "silent",
                "clear": true
            },
            "problemMatcher": {
                "pattern": {
                    "regexp": "^(.*):(\\d+):(\\d+):\\s+(warning|error):\\s+(.*)$",
                    "file": 1,
                    "line": 2,
                    "column": 3,
                    "severity": 4,
                    "message": 5
                }
            }
        }
}
其中大部分内容由VSCode的模板文件自动生成,需要修改的部分是 command中的shell路径,这里用的是git中的sh.exe
problemMatcher如果安装了C/C++的插件可以直接用"problemMatcher": "$gcc",我这里从网上找了个gcc错误输出的正则规则。
在VSCode中启动OpenOCD的gdbserver
在使用gdb调试前需要正确启动gdbserver,这里我将gdbserver的启动也放到了VSCode的task中。启动OpenOCD gdbserver的task配置如下:
 "tasks": [
     {
         "label": "start gdb server",
         "type": "shell",
         "command": "openocd",
         "args": [
             "-f",
             "interface/stlink.cfg",
             "-f",
             "target/${input:MCUType}.cfg",
             "-f",
             "target/patch_stlink.cfg",
         ],
         "presentation": {
             "reveal": "silent",
             "clear": true
         },
         "problemMatcher": "$msCompile"
     },
 ],
 "inputs": [
     {
       "type": "pickString",
       "id": "MCUType",
       "description": "Select the MCU family?",
       "options": [
         "stm32f0x",
         "stm32f1x",
         "stm32f2x",
         "stm32f3x",
         "stm32f4x",
         "stm32f7x",
         "stm32h7x",
       ],
       "default": "stm32f7x"
     },
]
启动时根据要调试的芯片型号选择芯片类型,在OpenOCD中不同的芯片类型使用不同的配置文件。在开始调试前一定要先启动OpenOCD的gdbserver。
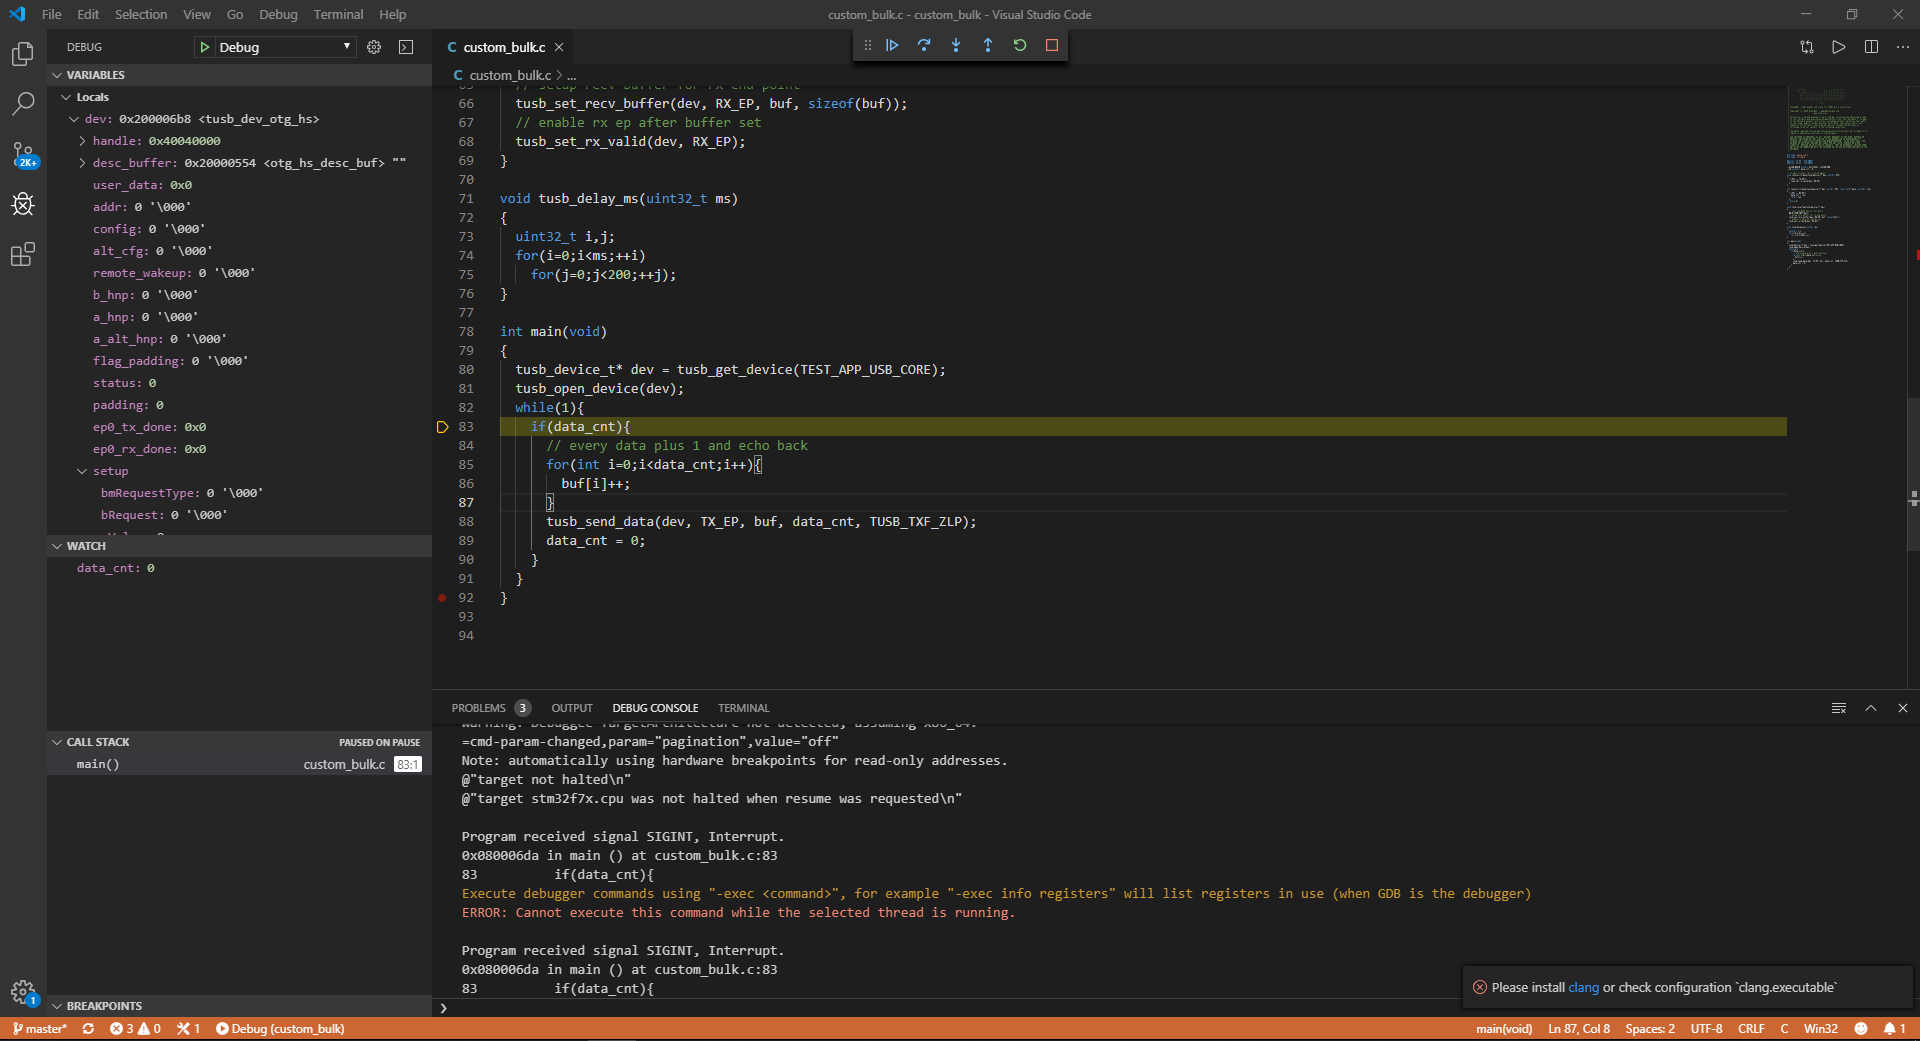
VSCode调试环境配置
在VSCode中安装 C/C++ For Visual Studio Code的插件。安装成功后,在工程目录下的.vscode目录中建立一个launch.json的文件或者是通过debug的模板来创建。
文件内容如下:
{
    // Use IntelliSense to learn about possible attributes.
    // Hover to view descriptions of existing attributes.
    // For more information, visit: https://go.microsoft.com/fwlink/?linkid=830387
    "version": "0.2.0",
    "configurations": [
        {
            "name": "Debug",
            "type": "cppdbg",
            "request": "launch",
            "program": "${workspaceFolder}/output/${input:targetType}bulk.elf",
            "args": [
            ],
            "stopAtEntry": false,
            "cwd": "${workspaceFolder}",
            "environment": [
                {
                    // Because the setup command can not pass the '\' into gdb
                    // So add the elf file path here
                    "name": "Path",
                    "value": "${env:Path};${workspaceFolder}/output"
                }
            ],
            "externalConsole": false,
            "MIMode": "gdb",
            "miDebuggerPath": "arm-none-eabi-gdb.exe",
            // we can not pass the targetType input varible to the bulld task
            // https://github.com/microsoft/vscode/issues/4758
            "preLaunchTask": "build",
            "setupCommands": [
                {
                    "description": "Enable pretty-printing for gdb",
                    "text": "-enable-pretty-printing",
                    "ignoreFailures": true,
                },
                {
                    "text":"file ${input:targetType}bulk.elf",
                },
                {
                    "text": "target remote localhost:3333",
                },
                {
                    "text": "load",
                },
                {
                    "text": "monitor reset",
                },
                {
                    "text": "b main",
                },
            ],
        }
    ],
    "inputs": [
        {
          "type": "pickString",
          "id": "targetType",
          "description": "Select the target type?",
          "options": [
            "f072",
            "f103",
            "f303",
            "f407",
            "f723",
            "f767"
          ],
          "default": "f723"
        }
      ]
}
由于VSCode的cppdbg插件不能正确地将带有反斜杠”\”的路径传入gdb中,因此我把输出文件的路径放到了启动gdb的环境变量中。
输出文件使用了input变量,在启动debug的时候会提示选择要调试的目标类型,适合有多种芯片配置的情况。
完整的STM32开源开发环境工程在这里: https://github.com/xtoolbox/TeenyUSB/tree/master/demo/custom_bulk
STM32开源开发环境搭建
2019-10-12
嵌入式
No Comments
xtoolbox
本文主要介绍如何在Windows上搭建STM32的开源开发环境
使用到的工具有:VSCode, arm-none-eabi-gcc,TortoiseGit,OpenOCD, mingw32-make,
在整个开源环境中,可以完成开发,编译,下载,调试这些基本功能。
TortoiseGit安装
TortoiseGit是Windows下的图形化git工具,这里选择它是因为它还提供了一个mingw的环境,后继的开发可以使用这个mingw环境,就不用再额外安装了。
官方下载地址: https://tortoisegit.org
安装时勾选上bash相关的内容,安装成功后在右键菜单中可以进行到bash环境。
为了方便后面的使用,我们还需要在TortoiseGit的bash环境中加入make命令。笔者的电脑上有Qt的开发环境,我从里面找到了一个mingw32-make的exe文件,把名字修改成make后放到了【git安装目录】/mingw64/bin中。
注意是git的安装目录,不是TortoiseGit的目录。在这里我也把这个Qt中的mingw32-make文件上传了,点击下载 make 。
虽然这个make是32位的,但是放在mingw64中也可以很好的运行,应该是这个make没有什么外部依赖,所以在哪都能运行。
通过右键菜单进入GitBash,输入make,看看我们的make是否安装成功。
Git默认安装在“Program Files”目录中,这个目录名中有一个空格,有些时候会出一些问题,笔者建议将Git相关的的东西安装在一个目录中没有空格和中文的地方。
arm-none-eabi-gcc安装
arm-none-eabi-gcc是针对ARM处理的gcc工具
官方下载址: arm-none-eabi-gcc
可以只下载zip包,解压后在环境变量中配置上相应的路径就行了。在命令行中输入arm-none-eabi-gcc检测是配置成功。
OpenOCD安装及测试
这里我使用OpenOCD做为gdb server,有了gdb server之后就可以用arm-none-eabi-gdb进行调试了。
先去网上下载一个编译好的OpenOCD程序,https://gnutoolchains.com/arm-eabi/openocd
解压后将OpenOCD的bin目录放到PATH环境变量中,然后在命令行中输入openocd,检测是否安装正确。
测试OpenOCD是否工作正常,以我手上的f723 discovery为例,输入下面的命令:
运行后如果提示verified OK,说明烧写成功,至此OpenOCD安装成功。
上面的patch_stlink.cfg是我新建的一个文件,放在【OpenOCD安装目录】/share/openocd/scripts/target 这个路径中,用来解决ST-link没有RST信号停止芯片失败的问题。
这个文件中只有一行命令,内容如下:
VSCode安装及配置
这里我选择VSCode作为集成开发环境,并把前面提到的工具配置到VSCode中,完成开发。
VSCode官网:https://code.visualstudio.com
VSCode编译环境配置
VSCode中使用tasks.json配置编译环境,这里我使用的是mingw环境调用makefile进行编译。
tasks.json内容如下:
{ // See https://go.microsoft.com/fwlink/?LinkId=733558 // for the documentation about the tasks.json format "version": "2.0.0", "tasks": [ { "label": "build", "type": "shell", "command": "C:\\Program Files\\Git\\bin\\sh.exe", "args": [ "--login", "-i", "-c", "make -j4" ], "group": { "kind": "build", "isDefault": true, }, "presentation": { "reveal": "silent", "clear": true }, "problemMatcher": { "pattern": { "regexp": "^(.*):(\\d+):(\\d+):\\s+(warning|error):\\s+(.*)$", "file": 1, "line": 2, "column": 3, "severity": 4, "message": 5 } } } }其中大部分内容由VSCode的模板文件自动生成,需要修改的部分是 command中的shell路径,这里用的是git中的sh.exe
problemMatcher如果安装了C/C++的插件可以直接用
"problemMatcher": "$gcc",我这里从网上找了个gcc错误输出的正则规则。在VSCode中启动OpenOCD的gdbserver
在使用gdb调试前需要正确启动gdbserver,这里我将gdbserver的启动也放到了VSCode的task中。启动OpenOCD gdbserver的task配置如下:
"tasks": [ { "label": "start gdb server", "type": "shell", "command": "openocd", "args": [ "-f", "interface/stlink.cfg", "-f", "target/${input:MCUType}.cfg", "-f", "target/patch_stlink.cfg", ], "presentation": { "reveal": "silent", "clear": true }, "problemMatcher": "$msCompile" }, ], "inputs": [ { "type": "pickString", "id": "MCUType", "description": "Select the MCU family?", "options": [ "stm32f0x", "stm32f1x", "stm32f2x", "stm32f3x", "stm32f4x", "stm32f7x", "stm32h7x", ], "default": "stm32f7x" }, ]启动时根据要调试的芯片型号选择芯片类型,在OpenOCD中不同的芯片类型使用不同的配置文件。在开始调试前一定要先启动OpenOCD的gdbserver。
VSCode调试环境配置
在VSCode中安装 C/C++ For Visual Studio Code的插件。安装成功后,在工程目录下的.vscode目录中建立一个launch.json的文件或者是通过debug的模板来创建。
文件内容如下:
{ // Use IntelliSense to learn about possible attributes. // Hover to view descriptions of existing attributes. // For more information, visit: https://go.microsoft.com/fwlink/?linkid=830387 "version": "0.2.0", "configurations": [ { "name": "Debug", "type": "cppdbg", "request": "launch", "program": "${workspaceFolder}/output/${input:targetType}bulk.elf", "args": [ ], "stopAtEntry": false, "cwd": "${workspaceFolder}", "environment": [ { // Because the setup command can not pass the '\' into gdb // So add the elf file path here "name": "Path", "value": "${env:Path};${workspaceFolder}/output" } ], "externalConsole": false, "MIMode": "gdb", "miDebuggerPath": "arm-none-eabi-gdb.exe", // we can not pass the targetType input varible to the bulld task // https://github.com/microsoft/vscode/issues/4758 "preLaunchTask": "build", "setupCommands": [ { "description": "Enable pretty-printing for gdb", "text": "-enable-pretty-printing", "ignoreFailures": true, }, { "text":"file ${input:targetType}bulk.elf", }, { "text": "target remote localhost:3333", }, { "text": "load", }, { "text": "monitor reset", }, { "text": "b main", }, ], } ], "inputs": [ { "type": "pickString", "id": "targetType", "description": "Select the target type?", "options": [ "f072", "f103", "f303", "f407", "f723", "f767" ], "default": "f723" } ] }由于VSCode的cppdbg插件不能正确地将带有反斜杠”\”的路径传入gdb中,因此我把输出文件的路径放到了启动gdb的环境变量中。
输出文件使用了input变量,在启动debug的时候会提示选择要调试的目标类型,适合有多种芯片配置的情况。
完整的STM32开源开发环境工程在这里: https://github.com/xtoolbox/TeenyUSB/tree/master/demo/custom_bulk